2026-06-07

The end of “easy mode” in IT, or just another level of abstraction?

For many months now, I’ve been reading through social media, and it’s hard not to get the impression that a single tone often dominates the IT world: anxiety. Many people fear layoffs tied to developers - and others - being replaced by AI agents. Many are attacking this new direction, trying to undermine the quality of solutions delivered by AI.

However, I want to look at this entire situation from a different perspective. Because what many see as a "crisis" today, is something entirely different to me.

It’s simply the next shift in the level of abstraction.

History likes to repeat itself

If we look at the history of software engineering, we will notice a recurring pattern. Everything constantly shifts toward automation and giving up control:

  • In the beginning, there was Assembler: Developers controlled every CPU register and every byte of memory. Writing code was an almost physical craft.
  • Then came high-level languages: C, Java, Python. We handed over direct control of the CPU to compilers and interpreters. Many purists argued back then that "real programming is over."
  • Next came the era of frameworks: We stopped writing HTTP mechanisms, ORMs, or routing from scratch. We handed control over to Spring, React, or .NET to focus strictly on the business logic itself.

Every single time, the scenario was the same: developers handed a piece of manual control "higher up" to be able to build bigger, faster, and more complex things.

AI agents are not the end of IT. They are just another framework.

Today, we are facing the exact same process. We are starting to give up control to AI agents that code entire modules or refactor systems. And this is the inevitable direction that IT technology will follow.

The market is simply drastically changing the rules of the game and verifying who we really are:

  • The end of code monkeys: If your only skill was mechanically translating documentation into code, then yes - AI will do it faster and cheaper.
  • The rising role of architects: Today, a developer's job looks less and less like writing lines of code from scratch, and more and more like supervising autonomous agents, connecting architectural pieces, and managing a clean workflow.
  • Business and communication above all: Since code is becoming a readily available commodity, those who win are the ones who can manage requirements, talk to stakeholders, and understand business processes.

New times

For us engineers, this is no reason to panic, but a signal to take action. Instead of crying over the past, it’s time to accept the new level of abstraction, master the tools, and map out a new strategy. The IT market isn't dying. It just took another step forward.


2017-10-16

Problem with Error Handling in React 16

New Error Handler in ReactJS 16 gives some great changes to how React handles JavaScript errors inside components. But I found one problem with it in case described below.

We have global script Application.jsx


export default class extends React.Component {
    render() {
        return (
          <GlobalErrorBoundary>
    <Content/>
</GlobalErrorBoundary>
        )
    }
}

(I omit import sections in my snippets to show more concise code)

GlobalErrorBoundary.jsx


export default class extends React.Component {
    constructor(props) {
        super(props);
        this.state = {error: null};
    }
    componentDidCatch(error, errorInfo) {
        this.setState({error});
    }
    render() {
        if (this.state.error) {
            return (
                <p>Global Boundary</p>
            );
        }
        return this.props.children;
    }
}

Content.jsx

const _getElement = Symbol();
export default class extends React.Component {
    render() {
        return (
            <LocalErrorBoundary>
                {this[_getElement]()}
            </LocalErrorBoundary>
        )
    }
    [_getElement]() {
        return (<div><InnerComponent/><InnerComponent2/></div>)
    }
}

LocalErrorBoundary.jsx


export default class extends React.Component {
  constructor(props) {
    super(props);
    this.state = {error: null};
  }
  componentDidCatch(error, errorInfo) {
    this.setState({error});
  }
  render() {
    if (this.state.error) {
    return (
      <p>Local Boundary</p>
    );
  }
  return this.props.children;
 }

}

Component1.jsx


const _getElement = Symbol();
export default class extends React.Component {
    render() {
        return (
            <div>
                {this[_getElement]()};
            </div>
        )
    }
    [_getElement]() {
        return 'InnerComponent1'
    }
}

Component2.jsx


const _getElement = Symbol();
export default class extends React.Component {
  render() {
    return (
      <div>
        {this[_getElement]()};
      </div>
    )
  }
  [_getElement]() {
    return 'InnerComponent2'
  }

}

And waht will happened when Content.jsx thows an error?
[_getElement]() {
        throw 500;
    }

It will be cought by 
componentDidCatch(error, errorInfo) {
        this.setState({error});
    }

and printed what we expected:
<p>Global Boundary</p>

But what happenes when we have some widget s on our page and one of them throws an error? Error will be caughed by <LocalErrorBoundary> and will be printed: 
<p>Local Boundary</p>

In many cases this is a desirable behavior, but not in my case. 
In my case, when I have many independent widgets on page and each of them gets data content from other resource (which could thow an error) this solution does not work. I’ll expect that problematic widget, which throws an error, will print error information only in its own block and Error Handling will not stop rendering other widgets.

Maybe is the other solution? I'll try to find out.

2015-05-02

Check permissions in ZF2 Zend/Navigation with ZfcRbac

ZfcRbac is not tailored to work with Zend/Navigation. There aren’t any builded native solutions that gives ZfcRbac permission to enable or disable entry of menu. The solution for that problem is quite simple.
I found solution in this blog: http://blog.webdevilopers.net/check-zend-navigation-page-permissions-with-zfcrbac/. I based on it. But this solution caused a problem. Positions in menu are displayed only if perrmision is defined. If permission is not defined, menu’s posiotin is displayed.
I’ll show you how to implement checking perrmisions and enabled / disabled menu positions with ZfcRbac. There is only one change in RbacListener:


class RbacListener
{
  protected $authorizationService;


  public function __construct(AuthorizationServiceInterface $authorizationService)
  {
      $this->authorizationService = $authorizationService;
  }


  public function accept(EventInterface $event)
  {
      $page = $event->getParam('page');


      if (! $page instanceof AbstractPage) {
          return;
      }


      $permission = $page->getPermission();


      if (is_null($permission)) {
          $event->stopPropagation();
          return false;
      }


      $event->stopPropagation();


      return $this->authorizationService->isGranted($permission);
  }
}

2015-05-01

Do not mess your code!

PHP is great language that gives us flexibility. PHP has weak typing. On the other side, many programmers abuse it. They create little monsters and spaghetti code.


In this post I will show you, on simple example, how you should prevent yourself from ambiguous return value.


Base principle: You should always return the same type.


My favorite example:


/**
* @return mixed
*/
public function getProductList()
{
   $resultArray = $this->products->get();


   return empty($resultArray) ? $resultArray : null;
}


What’s wrong with it? Return value is ambiguous. In next step in your code, after calling this method you must check what method returned to you.

if ($return === null) {
   //do something...
} else {
   //do something...
}


In this example you have two statements to check. More clear is this code:


/**
* @return array
*/
public function getProductList()
{
   $resultArray = $this->products->get();


   return $resultArray;
}

In above example, you always gets the same type of result. On the other hand, you may use designed pattern, but this is the other solution, not described in this post.

2015-02-15

Session expire under Zend Framework 2

Few days ago I met a problem with session expire under Zend Framework 2. I set gc_maxlifetime in SessionManager but my session didn’t expire. Ok, you’ll say that I can set session.gc_maxlifetime in php.ini. Yes, I can and it’s one of the solutions. But in my solution, I want to manage session lifetime in application configuration. I looked deeper in ZF2 session implementation to find the problem and solutions. This is what I found.

My configuration looks like this:
<?php
//…
'session' => [
        'config' => [
            'class' => 'Zend\Session\Config\SessionConfig',
            'options' => [
                'name' => 'session_name',
                'use_cookies' => true,
                'gc_maxlifetime' => 1800
            ]
        ],
        'storage' => 'Zend\Session\Storage\SessionArrayStorage'
    ],
//…

And my SessionManager factory:

<?php
//…
class SessionManagerFactory implements FactoryInterface
{

    public function createService(ServiceLocatorInterface $serviceLocator)
    {
        $config = $serviceLocator->get('config');

        if (isset($config['session'])) {
            $session = $config['session'];

            $sessionConfig = null;
            if (isset($session['config'])) {
                $class = isset($session['config']['class']) ? $session['config']['class'] : 'Zend\Session\Config\SessionConfig';
                $options = isset($session['config']['options']) ? $session['config']['options'] : array();
                $sessionConfig = new $class();
                $sessionConfig->setOptions($options);
            }

            $sessionStorage = null;
            if (isset($session['storage'])) {
                $class = $session['storage'];
                $sessionStorage = new $class();
            }

            $sessionSaveHandler = null;
            if (isset($session['save_handler'])) {
                will require constructor arguments
                $sessionSaveHandler = $serviceLocator->get($session['save_handler']);
            }

            $sessionManager = new SessionManager($sessionConfig, $sessionStorage, $sessionSaveHandler);
        } else {
            $sessionManager = new SessionManager();
        }

        return $sessionManager;
    }
}

Ok, next step, I created session Container:

$sessionManager = $serviceLocator->get('my_project\SessionManager');        $container = new Container(’container_name’, sessionManager);

And what happened after 30 minutes? Nothing. My session still existed.

Let’s go deeper.

After first request Container will be created. If we print $_SESSION we will see something like this:
…
__ZF =>
[’container_name’] =>
['EXPIRE'] => 1423757542
…

After 30 minutes $_SESSION looks like this:
__ZF =>
[’container_name’] => null


And finally, my implementation to check if session has expired looks like this:

//...
abstract class ContainerFactoryAbstract implements FactoryInterface
{

    private $containerName;

    private $config;

    private $sessionManager;

    public function createService(ServiceLocatorInterface $serviceLocator)
    {
        if (is_null($this->containerName)) {
            throw new RuntimeException('Is not set name of container!');
        }

        $this->config = $serviceLocator->get('Config');
        $this->sessionManager = $serviceLocator->get('SysSession\SessionManager');

        $container = $this->getContainer();

        if ($this->isSessionExpired($this->containerName)) {
            $this->sessionManager->destroy();
        }

        if ($this->getSessionMaxLifeTime()) {
            $container->setExpirationSeconds($this->getSessionMaxLifeTime());
        }

        return $container;
    }

    public function setContainerName($name)
    {
        $this->containerName = $name;
    }

    private function getContainer()
    {
        return new Container($this->containerName, $this->sessionManager);
    }

    private function isSetInitialSecureData(Container $container)
    {
        return isset($container->init);
    }

    private function isSessionExpired($containerName)
    {
        if (! $this->isSetSessionMaxLifeTime($this->config)) {
            return false;
        }

        return (isset($_SESSION['__ZF'][$containerName]) && (! $this->isSetExpireTimestamp($containerName)));
    }

    private function isSetSessionMaxLifeTime()
    {
        return isset($this->config['session']['config']['options']['gc_maxlifetime']);
    }

    private function getSessionMaxLifeTime()
    {
        if (! $this->isSetSessionMaxLifeTime()) {
            throw new RuntimeException('Is not set value for gc_maxlifetime session!');
        }

        return $this->config['session']['config']['options']['gc_maxlifetime'];
    }

    private function isSetExpireTimestamp($containerName)
    {
        return isset($_SESSION['__ZF'][$containerName]['EXPIRE']);
    }
}

2014-12-07

Localizing Zend Framework 2 application with PoEdit

Zend Framework 2 provides Internationalisation (I18N) support. In this post I will give you instructions how to configure Zend Framework 2 to work with translation of your ZF2-Modules using PoEdit step-by-step. It may seem like yet-another Zend Framework 2 and PoEdit instruction. I’m writing it, because I haven’t found any complex instruction from the beginning to the end, how to start with Internationalisation and configuration of localizing in Zend Framework 2.

Configure localizing in Zend Framework 2

In your Application module_config.php add alias to MvcTranslator:

'service_manager' => [
    'aliases' => [
        'translator' => 'MvcTranslator'
    ]
],

This step is not required but it helps you to manage of “translator” configure section in every module. 

Next, add “translator” configure section in your module_config.php:

'translator' => [
    'locale' => 'en_GB',
    'translation_file_patterns' => [
        [
            'type' => 'gettext',
            'base_dir' => __DIR__ . '/../language',
            'pattern' => '%s.mo'
        ]
    ]
],

Do not forget to create “language” directory in module. Your module’s directories should look like this:

/- module
|-/ NAMESPACE
|-/ config
|-/ language
|-/ src
|-/ view
|- Module.php
^

Download and configure PoEdit

First of all, you must download PoEdit from project site and install it. Next, open PoEdit and go to menu: File > Preferences > Extractors tab. Find PHP on list and edit it. Be sure that you have *.phtml in List of extensions, if not, add it.


How to create language files

In this step I will show you how to create *.po files. 
Open PoEdit and go to menu: File > New. 
Select language which you want to translate, example: English (United Kingdom)


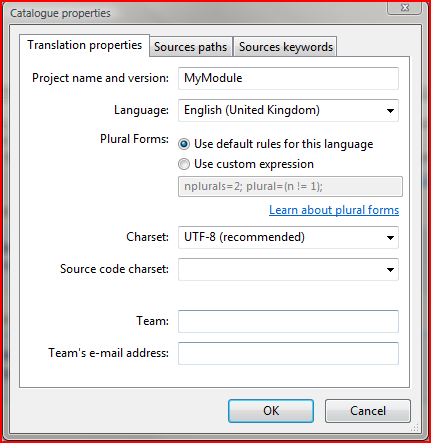
Then press OK. After that, save your en_GB.po file (press save) in your module’s “language” directory. Next, you have to set up special properties for en_GB.po - go to menu: Catalogue > Properties. 
In “Translation properties” set up name project:


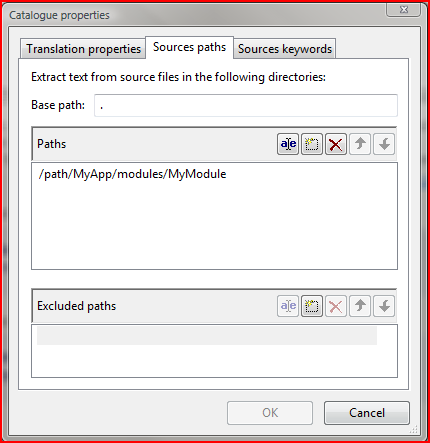
Open “Source paths” tab and set “Paths” like this:


“/path/MyApp/modules/MyModule” is the path to module in your application which you want to translate.
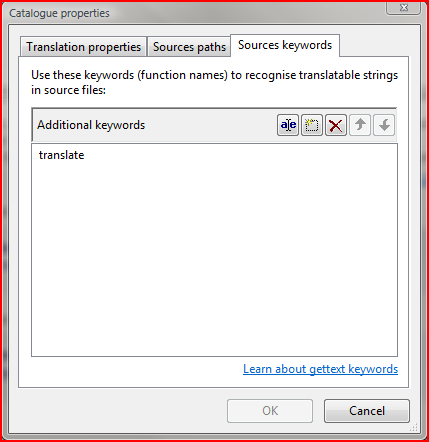
In “Sources keywords” tab add: translate


This keyword (translate) tells PoEdit that it should find all expressions in your module: translate; PoEdit finds every call of translate helper in your module. 
Press “Update”.


Then, in the “Source text” PoEdit will find and show every text to translate.

Use translate in Controllers

To add keywords to translate in your Controllers you can simply use:

$this->getServiceLocator()->get('translator')->translate('Text to translate');


Of course, it’s possible to translate texts in module class by passing translator object to them, but it’s strongly discouraged. You shouldn’t mix application and business logic.

Recognize of language client

In the end, you would like to set up selected language and translation to a user automatically, when user is visiting website. In Module.php simply add this:

$translator = $e->getApplication()
                ->getServiceManager()
                ->get('translator');

$translator
    ->setLocale(
        \Locale::acceptFromHttp(
            $_SERVER['HTTP_ACCEPT_LANGUAGE']
        )
    )
    ->setFallbackLocale('en_GB');

$_SERVER['HTTP_ACCEPT_LANGUAGE'] - gets the accepted languages from a browser. Module will be translated if application has the same *.po file as language sent by a browser . If not, “en_GB” will be set as a default language in setFallbackLocale('en_GB') method.

To use \Locale be sure that you have the intl-extension running. You must have

extension=php_intl.dll

enabled in your php.ini file.

In Module.php you can set your own methods to set language. It could be automatically set up as I showed you above or you can implement your own policy. It depends on your own preferences and needs.

2014-12-01

Lokalne repozytorium Composera

Composer szybko stał się standardem do zarządzania pakietami oraz ich zależnościami dla aplikacji PHP. Dzisiaj jest to podstawowe i niemal niezbędne narzędzie do pracy i rozwoju aplikacji. W tym wpisie chcę pokazać, jak w prosty i łatwy sposób utworzyć własny pakiet - repozytorium, by następnie pobrać go za pomocą Composera. 
Oczywiście, można użyć Satis lub Toran Proxy, aczkolwiek na własne potrzeby np. testów, wystarczy prostsze rozwiązanie, które opisuje w dalszej części posta.

Repozytorium Composera możemy utworzyć we własnej sieci np. na tym samym komputerze, na którym rozwijamy główny projekt, a następnie pobierać go przez Composera, bez publikowania go na GitHUB.

Czasem może zdarzyć się taka sytuacja, kiedy nie chcemy publikować naszego pakietu i umieszczać go publicznie na GitHUB. Może to być sytuacja w której, dopiero zaczynamy pracować nad własnym pakietem, nasz pakiet może być specyficzny tylko dla naszej aplikacji i nie nadaje się dla innych aplikacji, jak również może to być rozwiązanie zamknięte rozwijane na potrzeby projektu komercyjnego.

W tym wpisie nie będę opisywał podstaw Composera. Można z nimi się zapoznać w oficjalnej dokumentacji.


Zaczynamy!

Na początku utworzymy nowy projekt. Jego struktura będzie wyglądała następująco:


main-project-directory
|-src
| \-module
|   \-Start.php
|-examples
\-test


Utwórzmy powyższą strukturę katalogów, a następnie zainicjujmy repozytorium git:


cd main-project-directory
git init
git add .
git commit -m "Pierwszy commit"


Już mamy utworzony projekt. Teraz możemy przystąpić do konfiguracji Composera w naszym projekcie. W tym celu tworzymy plik composer.json w głównym katalogu projektu, a następnie definiujemy konfigurację:


{
 "name": "my-projects/my-module",
 "description": "Description of my project",
 "type": "library",
 "license": "BSD",
 "keywords": [
   “keywords"
 ],
 "authors": [
   {
     "name": "Name Surname",
     "email": "email@email.com"
   }
 ],
 "version": "dev-master",
 "require": {
 },
 "autoload": {
   "psr-0": {
     "MyModule\\": "src/"
   }
 }
}


Z kolei w pliku composer.json projektu, do którego chcemy zaciągnąć nasz wcześniej utworzony moduł, musimy dodać wpis z repozytorium, z którego należy pobrać moduł:


{
   "name": "my_projects/main_project",
   "repositories": [{
       "type": "vcs",
        "url": "/path_to_module/my_module"
       }
   ],
   "require": {
       "my-projects/my-module" : "dev-master"
   }
}


Wartość dla “url” w sekcji "repositories" może być ścieżką na komputerze lokalnym albo adresem URL do którego jest dostęp w sieci.

Teraz wystarczy wydać polecenie > composer update, by pobrać do naszego miejsca docelowego utworzone wcześniej repozytorium.
Podczas konfiguracji composer.json w projekcie, do którego będzie zaciągane repozytorium, należy zwrócić szczególną uwagę na poprawność ścieżek - wielkość znaków ma znaczenie.